27 Jul 2011

Lady GaGa inspired :) part 1.

Today's look is a Lady Gaga inspired one. It's a simple look, wearable, but the lashes are quite glamorous. Next time I'll do a more non-wearable one :D


Let's start :D

1. Fill in your brows with a black eyeshadow ( we are recreating it from the picture, but if you want to wear it for a night out etc. use a shadow that's your shade ). For a base apply a blue/white pencil. Blend it out.

2. Now pack the blue eyeshadow on the lid with a wet brush. Blend the edges.


3.  Take a blending brush and a darker blue eyeshadow and put it into the crease. Highlight the browbone and inner corners with a white eyeshadow. Apply a rosey/orangey color under your eyes.

4. Apply a white eyeliner on your waterline. Line your upper lashline and under your eyes with a black liner. Add mascara and false lashes. ( I don't have them so I just put the mascara, and for fun draw a mole :D)

For the lips, just put a nude lipstick on. Add some bronzer and peach blush and you're done!


Final result:
I personaly LOVE Lady Gaga, her songs and make-up. :D Hope you've enjoyed, see you soon :)

25 Jul 2011

essence color&go - review and swatches :)

essence is a drugstore brand that I'm very satisfied with. The quality of products is not always good, but for my low budget it's quite ok. Here are some swatches of nailpolishes I love and I mostly use on my nails :)

First, it says quick drying. I can't tell it's drying so quick. And for some colors, you'll need 2 coats to get the perfect intensity. They last long, up to 5 days, and if you put a base and top coat it lasts even longer. A quick advice, try to use plastic glowes when you clean your house or wash dishes. :)

NOTE: This is not a sponsored post and the opinion about this product is mine and mine only.

Here are the shades that im really in love with:


1.) 43 where is the party?
This is a kind of interesting shade :D It's a  deep violet color with blue(ish) and green(ish) reflections in it. I applied 2 coats to get the deep color of it.
2.) 36 enchanted fairy
This is my favourite shade of all times. It's a paslety, milky pink with silver reflections in it. You can't actually see them, because they are so fine. On the photo 2 coats.

3.) 38 choose me!
Another favourite color of mine. A blue color with gold and blue sparkles in it. 2 coats for the perfect intensity. When it's dry it has that high gloss finish and a smooth surface.

4.) 10 ready for action
A true, bright  red color perfect for summer. A glossy finish, 2 coats needed. Like it!
At the end, the price. Well it depends on in which you buy it. I paid about 12 HRK. I really don't know how much you will find it :D
Do you like essence? Which colors are your favourites?

RedMonster xx

23 Jul 2011

Turquoise me :)

Here's another bright summer look. First sorry for the pictures, it was a rainy day so the colors are not as bright as I wanted. But still I think the pictures are ok. :)) Also, I've done this tutorial with an essence palette so I'll post pictures of colors I've used. It will be easier for you to see and use similar colors. Hope you'll like  it ;)

Here we go :
1. Apply a cream bronze base for the eyeshadow. I used the one from an Avon palette, but the name rubbed off so I can't tell you it's name. Shape your brows as usual.


2. Here's the palette, it's the essence quattro palette in o1 ciao bella ( sorry but it might be not available anymore, I'm not sure)


Take the color 1 and place it in the inner half of your eye. With the same color highlight under your browbone. Then take the color 2 and place it in the outer half of your eye. Blend this two colors together.


3. Then use the color 3 and blend it into the crease and a bit under your eyes. This will contour your eyes and give it depth.


4. Here's the bight part.:D Take a turquise color and apply it under your eyes over the bronze color we've put before. Line just a quarter of your waterline with black liner. Your eyes willa appear rounder.


6. Finish off with mascara ( I used Max Factor False Lash Effect in black) and put a nude lipgloss ( essence xxxl nudes in 02 light candy)


Final result:


And this is it. Comment if you like it. See you in my next post.
RedMonster xx

20 Jul 2011

Purple summer^^

Hello everyone! Here comes a new tutorial with yellow and purple, a strange but pretty combination :)
Hope you'll enjoy it!


1. Shape your brows as you usually do and apply a base to your lid ( a yellow pencil/eyeshadow or a white one) and blend it. If you are using a white pencil, highligt under the browbone and inner corner.


   2. Now with a fluffy brush apply a yellow color and blend the edges. Also take a white shimmering shadow and apply it as a highlight over the pencil you've applied earlier. 


3. Take a purple eyeshadow and apply it to the crease and the outer corner in a "v" shape. Blend it well with the yellow shadow. If the yellow is not so intense as before, reapply it. You can wing it to create that cat-eye effect.


4. Take the same eyeshadow and apply it under your eyes. Line your eyes with a black liner and wing it out. The line depends on how you like to wear it. Instead of a black line on the waterline use a white pencil so your eyes look fresh and awaken. At the end curl your lashes and apply mascara. False lashes are optional. For the lips I used a coral lipstick, or use a nude one. Over the top a bit of lipgloss.


Final result:

So here you are.;) A nice, easy summer look. See you in my next post ;)

RedMonster xx

19 Jul 2011

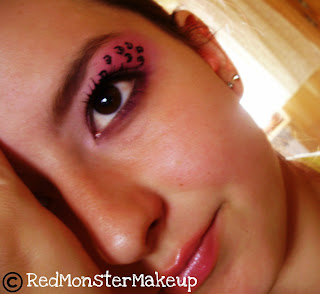
Pink leopard look^^

  I've been looking through my previous make-up looks and I found a contest entry for a masquerade make-up. I've done a leopard look and I thougt i should do a more wearable one.

One of my favourite leopard combination is pink and the print. I made a step by step tutorial so hope 
you'll enjoy it. Comment if you like it ^^


Contest entry:


Let's get started :D
        1.   For a base apply a white kohl pencil and create a shape you like. Smudge the pencil with your finger or  using a sponge tip aplicator. Don't forget to apply the pencil under your eye because we'll be putting eyeshadow  there too. Your eyebrows have to be nice and dark so they'll frame your face and the look were're creating. Shape them as you usually do.


2. Now take a fluffy brush and a bright pink eyeshadow and pack it on the lid and the shape we've created so the color is intense. Blend the edges. Add highlight in the inner corner. Use a white or a pink pearl eyeshadow.


  .    3. Use a flat or an angled brush and dip it into a deep purple color. Apply that under your eye and close to your upper lashline. Blend it so there aren't harh edges. If you want to line your eyes with a black liner for more dramaric eyes.


        4. Here comes the fun part! :D Take a liquid or gel liner (the one you feel more comfortable with) and start drawing the leopard print. Don't do too much. It can look messy at the end. For an extra effect, add glitter, but I went out of it so I didn't do that. At the end curl your lashes, apply coats of mascara (false lashes are optional) and you are done! :))


I would not use blush just a bit of bronzer. For the lips I used a soft shimmer pink lipstick. :)


Final result:

Hope you liked it, see you in my next post! :)

RedMonster xx